Wednesday, March 26, 2025

Blossom - An Island Batik Challenge Quilt March 2025


As an Island Batik Ambassador, we receive monthly challenges to create original projects using beautiful Island Batik fabrics that are currently shipping to quilt shops.  I decided to use the same collection that I used for the February challenge, Petal Poetry, as I had not used all of the fabrics and I wanted to showcase them a little better. I originally made about 70 blocks which used all of the fabrics, but I was not happy with the layout. It was too cluttered. So I used about 33 here and I have enough to do another quilt which will look very different as the greens are more dominant in those blocks. This quilt has all the greens but features the purple and blue fabrics as the focus.


I decided to create a kaleidoscope block using one of the Studio 180 Design tech sheets for a cyclone block using the Tucker Trimmers. Love the Tucker Trimmers as you can square up or cut accurate segments on just about anything! Deb has some great videos as well as patterns for this technique on her website so check it out!


To start, I created strip sets which I then cut my wedges from using the Tucker Trimmer III.  My blocks finish at 8" so I used 2" strips for my strip sets.  It's important that your 1/4 inch seam is accurate when doing strip sets so that your wedges will all come out the same size and line up in the center. 


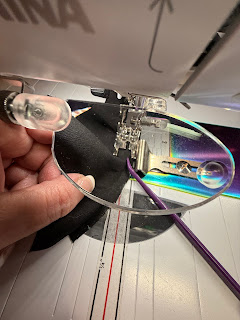
I used a seam guide to make sure my strips stayed nice and straight as I fed them through the machine. Of course Princess Luna was on hand to closely inspect the strips as I sewed them. Her inspection station is the top drawer in my sewing table with her special cat princess blanket which she does not allow her brother to use. A true princess! LOL


Once we passed inspection, it was time to move all the strip sets over to the ironing board.


Pressing is important. I usually align my strips with the edge of my felt pressing pad to make sure they are straight and do not distort or curve when pressed. As these blocks have a lot of seams and use 8 wedges which need to come to a perfect point in the center, I opted to press all seams open. I like to use these pressing sticks from the Strip Stick Company. I have them in different lengths. Very handy!

Next the segments were cut from the strips sets and the triangles cut, then trimmed into wedges.


I kept all my wedges together in groups of 8 (one block) and sewed pairs together. Really great thing about these blocks are that there are no matching seams when joining the wedges. How great is that! This part of the process actually went pretty quick!

I like to chain sew whenever possible so everything stays together and you save some time. Once the pairs were all sewn, they needed to have the seams pressed open. I like to use a wooden clapper and a felt mat and steam to make the seams as flat as possible.


When you are matching up the pairs and sewing them into the blocks, put a pin through the center intersections to line them up for perfect center points.

 Once the pairs were all sewn, they needed to get trimmed again using the Tucker Trimmer III. This insured a true 90 degree corner. Once all the pairs were trimmed, it was easy to go back and sew 2 sets of pairs together to create half the block, then sew the halves together to create the full block.  Once that was done, all seams were pressed open and they need one more trim on the Tucker Trimmer III.
Once that was complete, I added triangles on the corners then squared the blocks to 8 1/2"


I ended up make around 70 blocks as my original plan was to just join them together into rows but it just seemed to busy and cluttered when I had it up on the design wall so I changed the layout.  I really wanted it to be like a blossom with layers and some depth to the center so I used a fractured layout just in the center, splitting the blocks around the middle in half.

I like lots of negative space and I really felt that a border was not needed so I did a flanged binding with just a small peek of color to offset the quilt.  Here's a few pictures of the final!  


That's it for this week!  Be sure to check out the blogs for the other ambassadors. There were some really amazing projects created this month!  Until next time, happy sewing!

Best
Sue


Tuesday, February 18, 2025

Island Batik Runner Up Challenge Week 3 - Iris Gone Mod


Welcome to the Island Batik Runner Up Blog Hop!  I hope you have been enjoying all the wonderful projects my fellow ambassadors have been posting all month long.  This week, my challenge runner is up on stage!  I call her Iris Gone Mod.  She is a fun runner that can be small, large or anything in between as it is block based. I chose to do a larger version with four blocks that finished at 24" x 72".  I just loved all the colors and the way they play together.  Here is my mock up of the design.

My inspiration came from the Japanese Iris that are in my front garden.  I used EQ8 to design my project and provide the cutting advice for the background and sashing pieces.

My challenge was to use the beautiful Island Batik Petal Poetry collection and the Deb Tucker Studio 180 Design ruler for Split Rects. This is a super easy tool to use and has many options. There are also some great variations on an additional Technique Sheet that Deb has created for us. She also has a great video tutorial on how to use the tool.


I wish I could have used every color in this collection but it was not possible. But I plan on using them all in some additional projects I have planned.


My design used all the purples and the blue greens. I also used some of the greens for my accent leaves. For my background, I used a great background called Muslin. For my iris leaves and the border and binding, I used Island Batik Green Leaf Bubble Hole.

First steps were to press all my fabric then cut strips to use with the Split Rect tool.  The ruler tells you what size strip to cut based on the desired finished size.  My units finished at 1 1/2" x 3". I cut 4" wide strips. As I needed my units to be mirrored for the right and left side iris sections, I placed my fabric folded wrong sides together and cut with the right side on top. For units all the same, as in my inner border, you would place the fabrics stacked all going the same. So for my inner border units, all my fabrics were stacked right side up.


For your first cut, use the right side of the unit aligned to a straight fabric edge. In my case, I aligned to the line that says finished size 1 1/2" x 3".

For the second cut, simply turn your ruler and line up on the cut mark.  Continue cutting from your fabrics until you have the required number of segments.


The segments were sewn into mirrored pairs based on the color combinations required for my design. The units are slightly offset when placed RST to sew using a 1/4" allowance. There is plenty of fabric to trim to perfection so don't worry about exact placement when lining them up.

Once they are sewn, press your seams open. There are a lot of seams in this piece so pressing open helps to keep everything nice and flat.  Also a pressing agent such as Best Press or Flat can be very helpful.


The final trim to size is next. There are two cuts to make,. Line up the seam to the corresponding finished size on the ruler and trim. Then simply turn, line up the seam and the trimmed sides to your finished size lines and trim to perfection!


I also needed to make some flying geese for the tip of my iris as well as the base. I used the Fast Four method which gave me the perfect amount for my four blocks. There is a great video by Deb Tucker on perfecting this method.  I used the Deb Tucker Studio 180 Design Magic Wand for my sew lines and the Wing Clipper for my trimming. 

Once all my units were made, I laid out my blocks into vertical rows with my background pieces and sewed them in order. I then joined the rows in three sections: Left, center and right. This was necessary as the small flying geese actually spanned across all 3 center rows.  Once the flying geese units were attached, I sewed the 3 sections together.


The green flying geese at the bottom of each iris were created with flying geese units sewn into a sashing strip then attached.  I used Auriful thread and a Schmetz Microtek 80/12  needle for this project. They are my favorites!  As I really wanted the design and fabrics to shine, I did my quilting with the Aurifil as well, rather than a heavier top stitch or quilting weight thread. I really like the results. For my piecing, I used Aurifil Dove Grey 2600. I use it for all my piecing as the color just fades into everything, making it perfect for many lights, most mediums and some dark colors.  Perfect blending every time.

I layered my top with Hobbs Cotton Heirloom Batting. The natural color worked versus a bleached as my background fabric was dense enough to block any color bleed through.


And the final result!


The materials used to make Iris Gone Mod were provided by Island Batik and our generous sponsors Deb Tucker's Studio 180 Design, Aurifil Thread, Schmetz Needles, Hobbs Batting and Oliso. Many thanks for providing such quality tools and materials for a better finished project!

Thanks for following along.

Best,

Sue


Follow these simple instruction to be entered for our Week 3 Giveaway! Enter Here

Have you been following the Runner Up blog hop?  Here's a list of the entire hop so you can see what all of the Island Batik Ambassadors made with the new fabric collections.  So much inspiration so check them out!  Links provided below:

February 4: