Hello Everyone
This was to be our finish for the quilt but I would like to take a bit of time with the Arrow Block and put the sewing rows together and finishing in a separtae post today. The arrow is amazingly cute but does have a few small parts. It was fairly easy to make you just need to take your time. For those that do not like sewing small pieces, I am including a foundation for paper piecing if that is your preference.
Download the Paper Piecing Foundation Here
For my arrow, I am using Sprig With Small Daisies Acorn Gold still in the lovely Island Batik Flower Pot collection. It is a lovely gold color with pink sprigs and daisies. How Perfect!
Cutting: I am working from 44" wide for Background and a fat quarter for my color.
Background: (5) 1"x WOF Split (9) the strips in half (9) 1" x 22" approx Subcut from the remaining strip (10) 1" x 2 1/2" rectangles.
(1) 3 1/2" x WOF (I had a piece of 3 1/2" left over from a block)
Subcut (3) 3 1/2" squares
(1) 3 1/2" x WOF (I had a piece of 3 1/2" left over from a block)
Subcut (3) 3 1/2" squares
(1) 2" x WOF Subcut (20) 2" squares (I had plenty of pieces from the blocks
that I used rather than a strip)
Acorn Gold: (1) 3 1/2" x 22" Subcut (5) 3 1/2" squares
(2) 2" x 22" Subcut (12) 2" squares
(4) 1 1/2" x 22"
(2) 1" x 22"
Flying Geese Four At A Time:
We are going to make 2 separate sets of geese. The arrow head has a gold body and white wings. The arrow tail has one the same but also needs one that has a white body and gold wings, so just opposite.
Step 1: Gather the (5) 3 1/2"Acorn Gold squares and the (20) 2" Background squares.
We need a total of 20 flying geese (2 per block) in this combination and each square is going
to give us 4 units.
Step 2: Place (2) 2" background squares RST on opposite corners of a 3 1/2" Acorn Gold square.
They will overlap in the center. Nudge these in a little bit from the edge,
roughly a 1/16" or so. It helps us with a little fudge factor space. Draw a line diagonally
from corner to corner crossing both background pieces. Slip a pin in to make sure they
don't move when your are sewing them. Sew 1/4" to each side of the line. Cut in between
your seam lines.
Step 3: Carefully press to the triangles, away from the body. Be sure your press straight and do
not distort the fabric. They are small. :-)


 Step 2: Cut 6" wide units from each strip set. You will need (10) for the arrow main body.


 #islandbatik #oliso #studio180design #dragonflyfiberart #aurifil
Step 4: Next we place another Background square on the new units we have created, nudging in
again about that 1/16th" from the edge. Draw a line, then sew 1/4" to each side. Cut
between the seams then press to the Backround fabric (to the triangle).
Step 5: Our geese need to be squared to 1 1/2" x 2 1/2". I used the Studio 180 Wing Clipper ruler.
You should now have (20) flying geese with white wings and Acorn Gold bodies.

Now repeat Steps 1 through 5 with the (3) 3 1/2" Background squares and the (12) Acorn Gold 2" squares. You will have 2 extra geese as we only need (10) in this combination but it is the easiest and most efficient way to make them.

Strip Sets for Arrow Body & Tip:
Step 1: Gather the (4) 1 1/2" Acorn Gold strips and (8) 1" x 22" Background strips.
Make strip sets using the 1 colored strip and 2 background strips. Press all in to the Acorn
Gold strip in the center. Be careful when pressing not to distort your fabric or add a bow
to the stripset. It should be nice and straight. It should measure 2 1/2" x 22" approximately.

Step 3: Gather the (2) 1" Acorn Gold strips and (2) Background strips. Sew the strips together
and press to the Acorn Gold strip. It should measue 1 1/2" x 22" approx.
Step 4: Cut (10) 1 1/2" x 2 1/2" units from the strips.

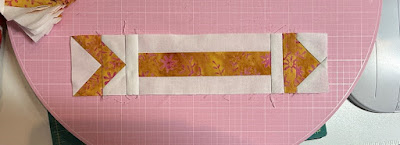
We are now ready to assemble our arrows. Sew the pieces in order as they are laid out below, starting at the tail of the arrow. Follow the direction of the arrows on the block diagram for the pressing. Make (10) arrow blocks. These should measure 2 1/2" x 10 1/2".


Now we have all our pieces made to start assembling our quilt. I will do that in the next blog post.
Happy Sewing!
Sue
No comments:
Post a Comment
Please Comment With Your Thoughts!