Showing posts with label quiltingtutorial. Show all posts

Wednesday, March 26, 2025

Blossom - An Island Batik Challenge Quilt March 2025


As an Island Batik Ambassador, we receive monthly challenges to create original projects using beautiful Island Batik fabrics that are currently shipping to quilt shops.  I decided to use the same collection that I used for the February challenge, Petal Poetry, as I had not used all of the fabrics and I wanted to showcase them a little better. I originally made about 70 blocks which used all of the fabrics, but I was not happy with the layout. It was too cluttered. So I used about 33 here and I have enough to do another quilt which will look very different as the greens are more dominant in those blocks. This quilt has all the greens but features the purple and blue fabrics as the focus.


I decided to create a kaleidoscope block using one of the Studio 180 Design tech sheets for a cyclone block using the Tucker Trimmers. Love the Tucker Trimmers as you can square up or cut accurate segments on just about anything! Deb has some great videos as well as patterns for this technique on her website so check it out!


To start, I created strip sets which I then cut my wedges from using the Tucker Trimmer III.  My blocks finish at 8" so I used 2" strips for my strip sets.  It's important that your 1/4 inch seam is accurate when doing strip sets so that your wedges will all come out the same size and line up in the center. 


I used a seam guide to make sure my strips stayed nice and straight as I fed them through the machine. Of course Princess Luna was on hand to closely inspect the strips as I sewed them. Her inspection station is the top drawer in my sewing table with her special cat princess blanket which she does not allow her brother to use. A true princess! LOL


Once we passed inspection, it was time to move all the strip sets over to the ironing board.


Pressing is important. I usually align my strips with the edge of my felt pressing pad to make sure they are straight and do not distort or curve when pressed. As these blocks have a lot of seams and use 8 wedges which need to come to a perfect point in the center, I opted to press all seams open. I like to use these pressing sticks from the Strip Stick Company. I have them in different lengths. Very handy!

Next the segments were cut from the strips sets and the triangles cut, then trimmed into wedges.


I kept all my wedges together in groups of 8 (one block) and sewed pairs together. Really great thing about these blocks are that there are no matching seams when joining the wedges. How great is that! This part of the process actually went pretty quick!

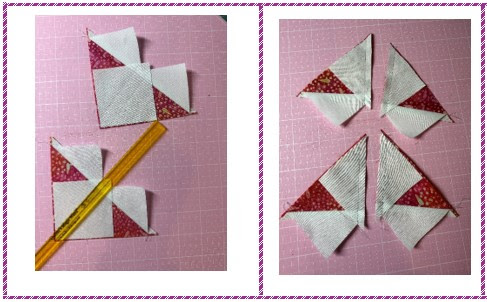
I like to chain sew whenever possible so everything stays together and you save some time. Once the pairs were all sewn, they needed to have the seams pressed open. I like to use a wooden clapper and a felt mat and steam to make the seams as flat as possible.


When you are matching up the pairs and sewing them into the blocks, put a pin through the center intersections to line them up for perfect center points.

 Once the pairs were all sewn, they needed to get trimmed again using the Tucker Trimmer III. This insured a true 90 degree corner. Once all the pairs were trimmed, it was easy to go back and sew 2 sets of pairs together to create half the block, then sew the halves together to create the full block.  Once that was done, all seams were pressed open and they need one more trim on the Tucker Trimmer III.
Once that was complete, I added triangles on the corners then squared the blocks to 8 1/2"


I ended up make around 70 blocks as my original plan was to just join them together into rows but it just seemed to busy and cluttered when I had it up on the design wall so I changed the layout.  I really wanted it to be like a blossom with layers and some depth to the center so I used a fractured layout just in the center, splitting the blocks around the middle in half.

I like lots of negative space and I really felt that a border was not needed so I did a flanged binding with just a small peek of color to offset the quilt.  Here's a few pictures of the final!  


That's it for this week!  Be sure to check out the blogs for the other ambassadors. There were some really amazing projects created this month!  Until next time, happy sewing!

Best
Sue


Sunday, January 26, 2025

Cupids's Arrow Part III

 Hello Everone! 

Some fun and easy blocks to make this week. We are making the Heart Block, the Checkerboard Border blocks and the Heart Cornerstone blocks.

We will start with the Heart Block which is super easy. As we have to make (4) blocks, we can use some shortcut methods that will give us all our units at once.  We will be making 8 at a time HST units and 4 at a time flying geese.  Here is my fabric cut.


WOF - Width of Fabric   HST - Half Square Triangle    QST - Quarter Square Triangle
RST - Right Sides Together

Background:   Cut (3) 2 1/2" x WOF.  Subcut (16) 2 1/2" x 6 1/2" rectangles (sashing)
                        Cut (1) 8 1/4" square (for HST units)
                        Cut (1) 2 1/2" x WOF.  Subcut (8) 2 1/2" squares  (for geese units)

Mini Daisy Pink Valetine:  Cut (2) 2 1/2" x 22"    Subcut (16) 2 1/2" squares (for cornerstones)

Petals Red Salmon:    Cut (2) 1 1/2" x 22"    Subcut (4) 1 1/2" x 6 1/2" rectangles (for center)
                                    Cut (2) 4 1/4" squares (for geese)
                                   Cut (1) 8 1/4" square (for HST units)

HST Units Eight At A Time:  
Step 1:  Gather the 8 1/4" background square and Petals Red Salmon square. Place RST with
             the background square on top. Using a ruler, draw a diagonal line from corner to corner
             both directions or use your magic wand to create sew lines.  
Step 2:  Sew your seams in both directions. It should look like a 'double X' once sewn. Using a 
            ruler, cut between the sew lines in both directions. Do not move any pieces yet. Take 
            your ruler and cut horizontally though the center, then vertically through the center.
            This is much easier to do without moving your parts if you use a rotating cutting mat.


Step 3: You now have (8) HST units. Press (4) of the units to the Background fabric and (4) of the
            units to the Petals Red Salmon fabric. This way our HST units will nest together. Square 
            your HST units to 3 1/2" using your favorite method. We will be using two for each heart 
            block. I used my Studio 180 Tucker Trimmer I.


                                You now have (8) 3 1/2" unfinished (3" finished) HST units.

Flying Geese Four At A Time:  
Step 1:  Next gather the 4 1/4" Petals Red Salmon squares and the (8) 2 1/2" Background squares.
            We need a total of 8 flying geese (2 per block) and each square is going to give us 4 units.
Step 2: Place (2) 2 1/2" background squares RST on opposite corners of a 4 1/4" Petals Red 
            Salmon square. They will overlap in the center. Nudge these in a little bit from the edge,
            roughly a 1/16" or so. It helps us with a little fudge factor space.  Draw a line diagonally
            from corner to corner crossing both background pieces. Slip a pin in to make sure they 
            don't move when your are sewing them. Sew 1/4" to each side of the line. Cut in between
            your seam lines.

Step 3:  Because we will need our geese to have nested seams when sewn together, we need to 
            press away from the triangle for this first step and toward the Petals Salmon Red fabric.
            Make sure your press straight and do not distort the fabric. 
Step 4: Next we place another Background square on the new units we have created, nudging in 
            again about that 1/16th" from the edge. Draw a line, then sew 1/4" to each side. Cut 
            between the seams then press to the Backround fabric (to the triangle). 
Step 5: Each of tour geese should now have one wing pressed in and one wing pressed out.  
            Our geese need to be squared to 2" x 3 1/2".  I used the Studio 180 Wing Clipper ruler.


Sashing Units:
Step 1: Next we can add our cornerstone squares to the top and bottom block sashing pieces 
            so they will be ready to use. Gather (16) Pink/Red 2 1/2" squares and (8) 2 1/2" 
            x 6 1/2" background rectangles. I like to chain sew for efficiency whenever possible and 
            this is a great place to do so. Place a Red/Pink square RST on a background rectangle. 
            Line up the edges and sew using a 1/4" seam. Repeat this for all 8 units. Do not cut the 
            chains yet. Simply turn the last piece in the machine around and sew squares to the 
            remaining end. Press all seams in toward the background fabric.


Heart Block Assembly:
Step 1:  Now we can assemble the blocks. Sew (2) Geese units together nesting the seams. Press
             the  seam to the right. 
Step 2:  Sew the 2" x 6 1/2" Petals Red Salmon piece to the bottom. Press to strip. 
Step 3:  Sew (2) HST units together nesting the seams. add these to the bottom of the assembly 
             from above.  Press to the center strip.
Step 4:  Sew a 2 1/2" x 6 1/2" background strip to each side. Press to the sashing strip.
Step 5:  Sew a sashing strip with cornerstone units to the top and the bottom. Press the seams out
             to the sashing strips.


Square your blocks to 10 1/2" as needed. (4) Heart Blocks Made


Border Checkerboard Blocks

Background:   Cut (5) 2 1/2" x WOF.  Cut in half to get (10) strips approx 22" long
                        Cut (4) 1 1/2" x WOF    (checkerboard border sashing)
                       
Mini Daisy Pink Flamingo:  Cut (5) 2 1/2" x 22"   

Sprig Small Daisy:    Cut (5) 2 1/2" x 22"   

Step 1: Make strip sets using the 2 colors and the background strips. Press all seams to the darker
            color. Be careful when pressing not to distort your fabric or add a bow to the stripset. It 
            should be nice and straight. It should measure 4 1/2" x 22" approximately.


Step 2:  Cut 2 1/2" wide units from each strip set. You will have (40) of each color combination.
Step 3: Sew the 2 1/2" units together as shown below. You will have (10) each of blocks that start
            with opposite colors. 


Press seams in for the ones that start with background (top one in picture)
Press seams out for the ones that start with a colored square (bottom one in picture)


NOTE:  This is an update. Instead of sewing the individual  1 1/2" strips, sew the checkerboard border pieces together first, measure then cut the 1 1/2" x WOF sashing to size. In a perfect world, this measures 40 1/2".  Press out to the background strip. Each checkerboard border has 2 each of the blocks. Rows always start with a checkerboard block that has a solid color top left.  Blocks alternate.


Cornerstone Heart Blocks:  

Our final units for this week are the Cornerstone Heart Blocks.  These are super simple as well. We are making HST units and some simple folded corner units.

Background:    Cut (1) 3 1/2" x WOF    Subcut (4) 3 1/2" squares (HST units)
                         Cut (1) 2" x WOF    Subcut (8) 2" squares and (8) 1 1/2" squares (Folded Corners)

Medium Daisy Multi:  Cut (4) 3 1/2" squares,  (8) 2" x 3" rectangles,  (8) 1 1/2" x 3" rectangles


Step1: Place the 3 1/2" Baclgrund square on top of the Medium Daisy Multi squares RST.  Draw
            a diagonal line corner to corner and sew on either side of the line or use your magic wand
            to create sew line.
Step 2: Cut in half bewteen the stitch lines and press (4) to the Background fabric and (4) to the
            Multi Daisy fabric so that our seams wll nest.  
Step 3: Square to 3" square.  (8) HST units made.


The upper part of the heart is made with two different size folder corner units.  Gather the rest of your pieces.

Step 1: Draw a diagonal line corner to corner on the back of all the Background 2" and 1 1/2" 
            squares. The drawn line is the sew line. 
Step 2:  Line up the squares on the corners of the corresponding side rectangles. We need 
            opposites so be certain to check that you have (4) of each with the diagonal line running
            left to right and (4) that are right to left.
Step 3: Sew ON the diagonal line. trim the seam allowance to 1/4". Press the seam on half to 
            the Background fabric and on half to the Medium Daisy Multi fabric so that our seams 
            will nest.


We are now ready to se our blocks.  Layout your units in order.


Step 4: Sew the HST units together and press the seam to the right.
Step 5: Sew the upper folded corner units together in pairs of a small unit and large unit, 
            making sure the seams nest. 
Step 6: Sew the units from Step 5 together and press the seams to the left.
            Sew this to the top of the HST assembly from Step 4.  Press the seam up toward the
            folded corner units. Square to 5 1/2" as needed. Make (4) Cornerstone Hearts.


We now have all our main blocks completed. Next week we will make the Arrow Border and assemble our quilt.  If you would like to get a jumpstart on the row assembly, simply sew the blocks in rows as per the quilt image below starting and ending each row with a Checkerboard Block. Alternate the pressing of the seams on each row so that seams will nest when joined.


Until Next Week
Best
Sue


Friday, October 15, 2021

Autumn Leaves Table Runner Free Pattern

 Hello Everyone!


I a new, fun Autumn project for you.  It is called Autumn Leaves and it is a lovely table runner to grace your homes for the season.  


I really had a lot of fun making this one.  The leaves are super simple and the border is all flying geese.  In the instruction, the fast four method of making flying geese is detailed.  I had a little fun with reversing the colors on a few of them so we have geese flying and chasing, creating the chevron effect.  I couldn't decide which I like better so I did one side traditional geese and the other side the chevron geese.  

Here is a close up of the leaf block.  These blocks finish at 10" so you can easily make your runner as long or short as you like or even make some matching placemats simply by adding geese to the right and left sides!


I hope you enjoy making it as much as I did!

Autumn Leaves Runner Instructions

Happy Fall!

Sue

Dragonfly Fiberart Pattern Company  www.dragonflyfiberart.com 


Wednesday, August 4, 2021

 Half Square Triangle Fun

There are so many different ways to make a half square triangle. Tonight on my sampler group sew, we explored a couple of different ways and I thought it would be nice to post the cheater chart with the sizes to cut the square for 8 at a time. I have done the math for you up to 8" finished but if you need larger, the formula is there for your reference.  I always add a 'fudge factor' to my cut size. For example, we were sewing 2 1/2" half square triangles to finish at 2".  The chart tells me to cut a 5 3/4" square but I added 1/4" and cut two 6" squares.  This gave me a little wiggle room to trim to perfection in case my seams were not perfect.

Finished Block Size

Minimum Size of Squares To Cut:*

Trim Pieced Block To:

A

A x 2 + 1 ¾”

A + ½”

1”

3 ¾”

1 ½”

1 ½”

4 ¾”

2”

2”

5 ¾”

2 ½”

2 ½”

6 ¾”

3”

3”

7 ¾”

3 ½”

3 ½”

8 ¾”

4”

4”

9 ¾”

4 ½”

4 ½”

10 ¾”

5”

5”

11 ¾”

5 ½”

5 ½”

12 ¾”

6”

6”

13 ¾”

6 ½”

6 ½”

14 ¾”

7”

7”

15 ¾”

7 ½”

7 ½”

16 ¾”

8”

8”

17 ¾”

8 ½”

 *ADD ¼” to the cut size of the square to allow a little fudge factor for trimming to perfection!

Once you have cut the two contrasting squares, layer them right sides together.  Draw a line on the diagonals, corner to corner.  Your block should have an 'X' on it.  Sew 1/4" to either side of the lines.  (Sew lines are the Blue dotted lines on diagram)

Cut lines are the Solid Black lines on the diagram. When the sewing is completed, line up a ruler to cut vertically straight through the middle of the block.  Without moving the sections, now place the ruler horizontally through the center and cut.  Again without moving the sections, place your ruler on the diagonal line corner to corner and cut between your seam lines.  You now have 8 half square triangles. Tip:  If you have a spinning cutting mat, it will make the cutting easier.

Press open to the darker side.  Now square your triangles to perfection using the TRIM block dimension in the chart.  When sewn into the quilt, your block will be the Finished block dimension in the chart.  My favorite ruler for trimming is the BlocLoc ruler but any square ruler will work.  Just be sure you are lined up on the diagonal seam.


Happy Sewing!

Sue

PS.  Be sure to visit our web site for great patterns, rulers, tools and more!