Tuesday, February 18, 2025

Island Batik Runner Up Challenge Week 3 - Iris Gone Mod


Welcome to the Island Batik Runner Up Blog Hop!  I hope you have been enjoying all the wonderful projects my fellow ambassadors have been posting all month long.  This week, my challenge runner is up on stage!  I call her Iris Gone Mod.  She is a fun runner that can be small, large or anything in between as it is block based. I chose to do a larger version with four blocks that finished at 24" x 72".  I just loved all the colors and the way they play together.  Here is my mock up of the design.

My inspiration came from the Japanese Iris that are in my front garden.  I used EQ8 to design my project and provide the cutting advice for the background and sashing pieces.

My challenge was to use the beautiful Island Batik Petal Poetry collection and the Deb Tucker Studio 180 Design ruler for Split Rects. This is a super easy tool to use and has many options. There are also some great variations on an additional Technique Sheet that Deb has created for us. She also has a great video tutorial on how to use the tool.


I wish I could have used every color in this collection but it was not possible. But I plan on using them all in some additional projects I have planned.


My design used all the purples and the blue greens. I also used some of the greens for my accent leaves. For my background, I used a great background called Muslin. For my iris leaves and the border and binding, I used Island Batik Green Leaf Bubble Hole.

First steps were to press all my fabric then cut strips to use with the Split Rect tool.  The ruler tells you what size strip to cut based on the desired finished size.  My units finished at 1 1/2" x 3". I cut 4" wide strips. As I needed my units to be mirrored for the right and left side iris sections, I placed my fabric folded wrong sides together and cut with the right side on top. For units all the same, as in my inner border, you would place the fabrics stacked all going the same. So for my inner border units, all my fabrics were stacked right side up.


For your first cut, use the right side of the unit aligned to a straight fabric edge. In my case, I aligned to the line that says finished size 1 1/2" x 3".

For the second cut, simply turn your ruler and line up on the cut mark.  Continue cutting from your fabrics until you have the required number of segments.


The segments were sewn into mirrored pairs based on the color combinations required for my design. The units are slightly offset when placed RST to sew using a 1/4" allowance. There is plenty of fabric to trim to perfection so don't worry about exact placement when lining them up.

Once they are sewn, press your seams open. There are a lot of seams in this piece so pressing open helps to keep everything nice and flat.  Also a pressing agent such as Best Press or Flat can be very helpful.


The final trim to size is next. There are two cuts to make,. Line up the seam to the corresponding finished size on the ruler and trim. Then simply turn, line up the seam and the trimmed sides to your finished size lines and trim to perfection!


I also needed to make some flying geese for the tip of my iris as well as the base. I used the Fast Four method which gave me the perfect amount for my four blocks. There is a great video by Deb Tucker on perfecting this method.  I used the Deb Tucker Studio 180 Design Magic Wand for my sew lines and the Wing Clipper for my trimming. 

Once all my units were made, I laid out my blocks into vertical rows with my background pieces and sewed them in order. I then joined the rows in three sections: Left, center and right. This was necessary as the small flying geese actually spanned across all 3 center rows.  Once the flying geese units were attached, I sewed the 3 sections together.


The green flying geese at the bottom of each iris were created with flying geese units sewn into a sashing strip then attached.  I used Auriful thread and a Schmetz Microtek 80/12  needle for this project. They are my favorites!  As I really wanted the design and fabrics to shine, I did my quilting with the Aurifil as well, rather than a heavier top stitch or quilting weight thread. I really like the results. For my piecing, I used Aurifil Dove Grey 2600. I use it for all my piecing as the color just fades into everything, making it perfect for many lights, most mediums and some dark colors.  Perfect blending every time.

I layered my top with Hobbs Cotton Heirloom Batting. The natural color worked versus a bleached as my background fabric was dense enough to block any color bleed through.


And the final result!


The materials used to make Iris Gone Mod were provided by Island Batik and our generous sponsors Deb Tucker's Studio 180 Design, Aurifil Thread, Schmetz Needles, Hobbs Batting and Oliso. Many thanks for providing such quality tools and materials for a better finished project!

Thanks for following along.

Best,

Sue


Follow these simple instruction to be entered for our Week 3 Giveaway! Enter Here

Have you been following the Runner Up blog hop?  Here's a list of the entire hop so you can see what all of the Island Batik Ambassadors made with the new fabric collections.  So much inspiration so check them out!  Links provided below:

February 4:


Monday, February 3, 2025

Cupid's Arrow - The Finish

 Hello Everyone

We have everything made so let's put it together!  The only things we need to cut will be the outer borders. Then of course you will need to decide on backing and binding. We'll complete here with just the top but I will post mine once it is quilted and I would encourage you to do the same. 

Below is an exploded assembly diagram.

Sew the 4 rows across starting and ending with a Checkerboard square.

1st Row:  Checkerboard Block, 'L' Block, Star, Heart, Star, Checkerboard Block

2nd Row: Checkerboard Block, Sar, 'O' Block, Star. Heart, Checkerboard Block

3rd Row: Checkerboard Block, Heart, Star, 'V' Block, Star, Checkerboard Block

4th Row: Checkerboard Block, Star, Heart, Star 'E' Blcok, Checkerboard Block

Next, measure the sides of your quilt. Sew a 1 1/2" wide by your length strip to each side.  In a perfect world, this measurement is 40 1/2". 


Take the remaining 8 Checkerboard blocks and sew them into rows of (4) each. Use the diagram for reference to insure they are in the correct order.

Sew a 1 1/2" wide x 40 1/2" strip to the top of each. Sew the small heart blocks to each end.  All the hearts are facing up so be sure to sew them correctly nto the Checkerboard Borders just made.

Sew these borders to the top and bottom. To help the seams nest, it is easy to spin some of the seams on the Checkerboard Blocks so that they match the center quilt rows.

Cut (4) strips from Background 2 1/2" x WOF.  Subcut from these strips (4) 2 1/2" x 12 1/2" and (6) 2 1/2" x 10 1/2" pieces.

The Arrow side borders are:  Arrow Block 2 1/2" x 10 1/2" Background, Arrow Block, 2 1/2" x 10 1/2" Background., Arrow Block. Make the borders, then sew in place. Press away from the border.

The Arrow top and bottom borders are 2 1/2" x 12 1/2" Background, Arrow, 2 1/2" x 10 1/2", Arrow, 2 1/2" x 12 1/2". Sew in place then press away from the border.


Outside Border:

Background:    Cut (6) 2 1/2" x WOF

Sew (3) strips together on a 45 degree angle. Measure the sides of yor top and cut the border pieces from the strips et. Sew in place and press out to the border. 

Repeat for the top and bottom borders.

In a perfect world, the side borders would measure 54 1/2" and the top/bottom borders would measure 58 1/2".

You are finished! Layer, quilt and bind as desired. I am quilting mine with a swirl pattern and adding a pink and white flanged border. I will cover flanged machine binding in another blog so stay tuned.

Thanks for dsewing along!

Sue

Cupid's Arrow Part IV - The Arrow

Hello Everyone

 This was to be our finish for the quilt but I would like to take a bit of time with the Arrow Block and put the sewing rows together and finishing in a separtae post today. The arrow is amazingly cute but does have a few small parts. It was fairly easy to make you just need to take your time. For those that do not like sewing small pieces, I am including a foundation for paper piecing if that is your preference.

Download the Paper Piecing Foundation Here

For my arrow, I am using Sprig With Small Daisies Acorn Gold still in the lovely Island Batik Flower Pot collection. It is a lovely gold color with pink sprigs and daisies. How Perfect!

Cutting: I am working from 44" wide for Background and a fat quarter for my color.

Background:    (5) 1"x WOF    Split (9) the strips in half  (9) 1" x 22" approx  Subcut from the                                         remaining strip (10) 1" x 2 1/2" rectangles.
                        (1) 3 1/2" x WOF (I had a piece of 3 1/2" left over from a block) 
                        Subcut (3) 3 1/2" squares
                        (1) 2" x WOF    Subcut (20) 2" squares (I had plenty of pieces from the blocks 
                        that I used rather than a strip)

Acorn Gold:    (1) 3 1/2" x 22"    Subcut (5) 3 1/2" squares
                        (2) 2" x 22"          Subcut (12) 2" squares
                        (4) 1 1/2" x 22"    
                        (2) 1" x 22"

Flying Geese Four At A Time: 

We are going to make 2 separate sets of geese. The arrow head has a gold body and white wings.  The arrow tail has one the same but also needs one that has a white body and gold wings, so just opposite.
 
Step 1: Gather the (5) 3 1/2"Acorn Gold squares and the (20) 2" Background squares.
            We need a total of 20 flying geese (2 per block) in this combination and each square is going
            to give us 4 units.
Step 2: Place (2) 2" background squares RST on opposite corners of a 3 1/2" Acorn Gold square.
            They will overlap in the center. Nudge these in a little bit from the edge,
            roughly a 1/16" or so. It helps us with a little fudge factor space.  Draw a line diagonally
            from corner to corner crossing both background pieces. Slip a pin in to make sure they 
            don't move when your are sewing them. Sew 1/4" to each side of the line. Cut in between
            your seam lines.
Step 3: Carefully press to the triangles, away from the body. Be sure your press straight and do 
            not distort the fabric. They are small. :-)
Step 4: Next we place another Background square on the new units we have created, nudging in 
            again about that 1/16th" from the edge. Draw a line, then sew 1/4" to each side. Cut 
            between the seams then press to the Backround fabric (to the triangle). 
Step 5: Our geese need to be squared to 1 1/2" x 2 1/2".  I used the Studio 180 Wing Clipper ruler.
            You should now have (20) flying geese with white wings and Acorn Gold bodies.


Now repeat Steps 1 through 5 with the (3) 3 1/2" Background squares and the (12) Acorn Gold 2" squares. You will have 2 extra geese as we only need (10) in this combination but it is the easiest and most efficient way to make them.


Strip Sets for Arrow Body & Tip:

Step 1: Gather the (4) 1 1/2" Acorn Gold strips and (8) 1" x 22" Background strips.
            Make strip sets using the 1 colored strip and 2 background strips. Press all in to the Acorn
            Gold strip in the center. Be careful when pressing not to distort your fabric or add a bow 
            to the stripset. It should be nice and straight. It should measure 2 1/2" x 22" approximately.

Step 2: Cut 6" wide units from each strip set. You will need (10) for the arrow main body.

Step 3: Gather the (2) 1" Acorn Gold strips and (2) Background strips.  Sew the strips together
             and press to the Acorn Gold strip. It should measue 1 1/2" x 22" approx.
Step 4: Cut (10) 1 1/2" x 2 1/2" units from the strips. 


We are now ready to assemble our arrows. Sew the pieces in order as they are laid out below, starting at the tail of the arrow.  Follow the direction of the arrows on the block diagram for the pressing. Make (10) arrow blocks. These should measure 2 1/2" x 10 1/2".


Now we have all our pieces made to start assembling our quilt. I will do that in the next blog post.

Happy Sewing!
Sue

#islandbatik #oliso #studio180design #dragonflyfiberart #aurifil


Sunday, January 26, 2025

Cupids's Arrow Part III

 Hello Everone! 

Some fun and easy blocks to make this week. We are making the Heart Block, the Checkerboard Border blocks and the Heart Cornerstone blocks.

We will start with the Heart Block which is super easy. As we have to make (4) blocks, we can use some shortcut methods that will give us all our units at once.  We will be making 8 at a time HST units and 4 at a time flying geese.  Here is my fabric cut.


WOF - Width of Fabric   HST - Half Square Triangle    QST - Quarter Square Triangle
RST - Right Sides Together

Background:   Cut (3) 2 1/2" x WOF.  Subcut (16) 2 1/2" x 6 1/2" rectangles (sashing)
                        Cut (1) 8 1/4" square (for HST units)
                        Cut (1) 2 1/2" x WOF.  Subcut (8) 2 1/2" squares  (for geese units)

Mini Daisy Pink Valetine:  Cut (2) 2 1/2" x 22"    Subcut (16) 2 1/2" squares (for cornerstones)

Petals Red Salmon:    Cut (2) 1 1/2" x 22"    Subcut (4) 1 1/2" x 6 1/2" rectangles (for center)
                                    Cut (2) 4 1/4" squares (for geese)
                                   Cut (1) 8 1/4" square (for HST units)

HST Units Eight At A Time:  
Step 1:  Gather the 8 1/4" background square and Petals Red Salmon square. Place RST with
             the background square on top. Using a ruler, draw a diagonal line from corner to corner
             both directions or use your magic wand to create sew lines.  
Step 2:  Sew your seams in both directions. It should look like a 'double X' once sewn. Using a 
            ruler, cut between the sew lines in both directions. Do not move any pieces yet. Take 
            your ruler and cut horizontally though the center, then vertically through the center.
            This is much easier to do without moving your parts if you use a rotating cutting mat.


Step 3: You now have (8) HST units. Press (4) of the units to the Background fabric and (4) of the
            units to the Petals Red Salmon fabric. This way our HST units will nest together. Square 
            your HST units to 3 1/2" using your favorite method. We will be using two for each heart 
            block. I used my Studio 180 Tucker Trimmer I.


                                You now have (8) 3 1/2" unfinished (3" finished) HST units.

Flying Geese Four At A Time:  
Step 1:  Next gather the 4 1/4" Petals Red Salmon squares and the (8) 2 1/2" Background squares.
            We need a total of 8 flying geese (2 per block) and each square is going to give us 4 units.
Step 2: Place (2) 2 1/2" background squares RST on opposite corners of a 4 1/4" Petals Red 
            Salmon square. They will overlap in the center. Nudge these in a little bit from the edge,
            roughly a 1/16" or so. It helps us with a little fudge factor space.  Draw a line diagonally
            from corner to corner crossing both background pieces. Slip a pin in to make sure they 
            don't move when your are sewing them. Sew 1/4" to each side of the line. Cut in between
            your seam lines.

Step 3:  Because we will need our geese to have nested seams when sewn together, we need to 
            press away from the triangle for this first step and toward the Petals Salmon Red fabric.
            Make sure your press straight and do not distort the fabric. 
Step 4: Next we place another Background square on the new units we have created, nudging in 
            again about that 1/16th" from the edge. Draw a line, then sew 1/4" to each side. Cut 
            between the seams then press to the Backround fabric (to the triangle). 
Step 5: Each of tour geese should now have one wing pressed in and one wing pressed out.  
            Our geese need to be squared to 2" x 3 1/2".  I used the Studio 180 Wing Clipper ruler.


Sashing Units:
Step 1: Next we can add our cornerstone squares to the top and bottom block sashing pieces 
            so they will be ready to use. Gather (16) Pink/Red 2 1/2" squares and (8) 2 1/2" 
            x 6 1/2" background rectangles. I like to chain sew for efficiency whenever possible and 
            this is a great place to do so. Place a Red/Pink square RST on a background rectangle. 
            Line up the edges and sew using a 1/4" seam. Repeat this for all 8 units. Do not cut the 
            chains yet. Simply turn the last piece in the machine around and sew squares to the 
            remaining end. Press all seams in toward the background fabric.


Heart Block Assembly:
Step 1:  Now we can assemble the blocks. Sew (2) Geese units together nesting the seams. Press
             the  seam to the right. 
Step 2:  Sew the 2" x 6 1/2" Petals Red Salmon piece to the bottom. Press to strip. 
Step 3:  Sew (2) HST units together nesting the seams. add these to the bottom of the assembly 
             from above.  Press to the center strip.
Step 4:  Sew a 2 1/2" x 6 1/2" background strip to each side. Press to the sashing strip.
Step 5:  Sew a sashing strip with cornerstone units to the top and the bottom. Press the seams out
             to the sashing strips.


Square your blocks to 10 1/2" as needed. (4) Heart Blocks Made


Border Checkerboard Blocks

Background:   Cut (5) 2 1/2" x WOF.  Cut in half to get (10) strips approx 22" long
                        Cut (4) 1 1/2" x WOF    (checkerboard border sashing)
                       
Mini Daisy Pink Flamingo:  Cut (5) 2 1/2" x 22"   

Sprig Small Daisy:    Cut (5) 2 1/2" x 22"   

Step 1: Make strip sets using the 2 colors and the background strips. Press all seams to the darker
            color. Be careful when pressing not to distort your fabric or add a bow to the stripset. It 
            should be nice and straight. It should measure 4 1/2" x 22" approximately.


Step 2:  Cut 2 1/2" wide units from each strip set. You will have (40) of each color combination.
Step 3: Sew the 2 1/2" units together as shown below. You will have (10) each of blocks that start
            with opposite colors. 


Press seams in for the ones that start with background (top one in picture)
Press seams out for the ones that start with a colored square (bottom one in picture)


NOTE:  This is an update. Instead of sewing the individual  1 1/2" strips, sew the checkerboard border pieces together first, measure then cut the 1 1/2" x WOF sashing to size. In a perfect world, this measures 40 1/2".  Press out to the background strip. Each checkerboard border has 2 each of the blocks. Rows always start with a checkerboard block that has a solid color top left.  Blocks alternate.


Cornerstone Heart Blocks:  

Our final units for this week are the Cornerstone Heart Blocks.  These are super simple as well. We are making HST units and some simple folded corner units.

Background:    Cut (1) 3 1/2" x WOF    Subcut (4) 3 1/2" squares (HST units)
                         Cut (1) 2" x WOF    Subcut (8) 2" squares and (8) 1 1/2" squares (Folded Corners)

Medium Daisy Multi:  Cut (4) 3 1/2" squares,  (8) 2" x 3" rectangles,  (8) 1 1/2" x 3" rectangles


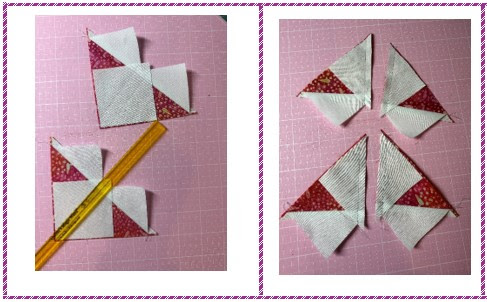
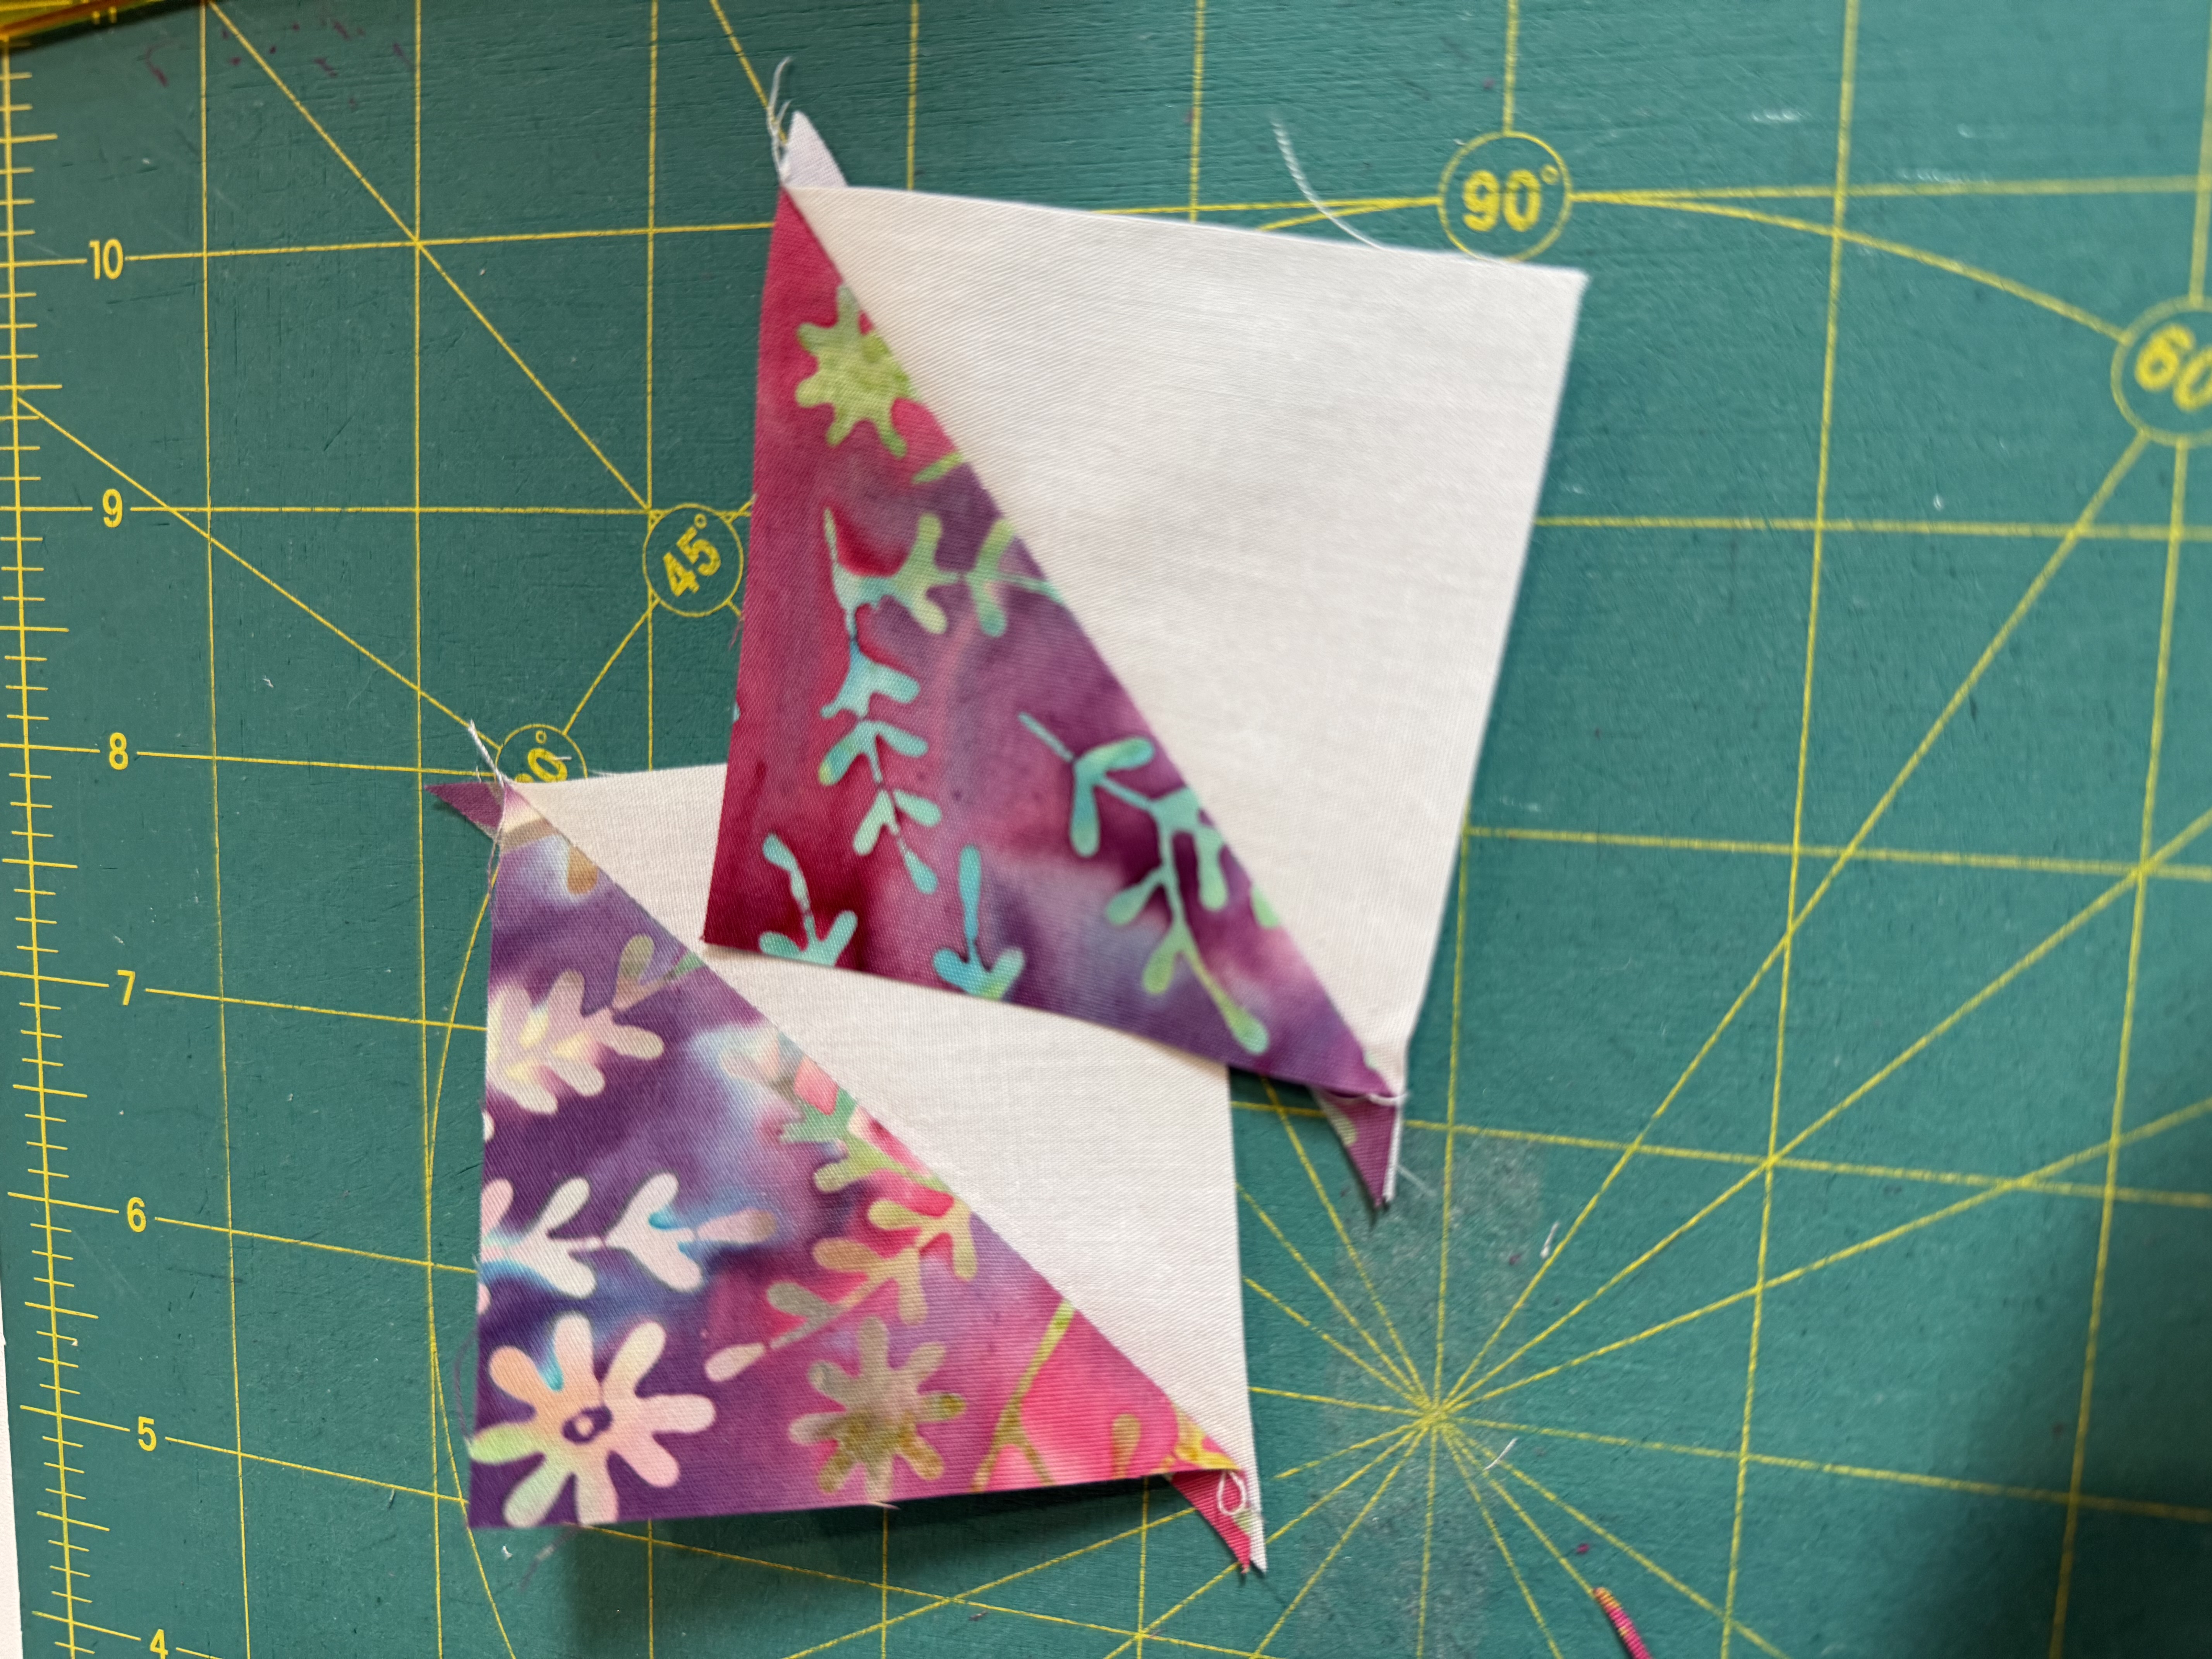
Step1: Place the 3 1/2" Baclgrund square on top of the Medium Daisy Multi squares RST.  Draw
            a diagonal line corner to corner and sew on either side of the line or use your magic wand
            to create sew line.
Step 2: Cut in half bewteen the stitch lines and press (4) to the Background fabric and (4) to the
            Multi Daisy fabric so that our seams wll nest.  
Step 3: Square to 3" square.  (8) HST units made.


The upper part of the heart is made with two different size folder corner units.  Gather the rest of your pieces.

Step 1: Draw a diagonal line corner to corner on the back of all the Background 2" and 1 1/2" 
            squares. The drawn line is the sew line. 
Step 2:  Line up the squares on the corners of the corresponding side rectangles. We need 
            opposites so be certain to check that you have (4) of each with the diagonal line running
            left to right and (4) that are right to left.
Step 3: Sew ON the diagonal line. trim the seam allowance to 1/4". Press the seam on half to 
            the Background fabric and on half to the Medium Daisy Multi fabric so that our seams 
            will nest.


We are now ready to se our blocks.  Layout your units in order.


Step 4: Sew the HST units together and press the seam to the right.
Step 5: Sew the upper folded corner units together in pairs of a small unit and large unit, 
            making sure the seams nest. 
Step 6: Sew the units from Step 5 together and press the seams to the left.
            Sew this to the top of the HST assembly from Step 4.  Press the seam up toward the
            folded corner units. Square to 5 1/2" as needed. Make (4) Cornerstone Hearts.


We now have all our main blocks completed. Next week we will make the Arrow Border and assemble our quilt.  If you would like to get a jumpstart on the row assembly, simply sew the blocks in rows as per the quilt image below starting and ending each row with a Checkerboard Block. Alternate the pressing of the seams on each row so that seams will nest when joined.


Until Next Week
Best
Sue


Monday, January 20, 2025

Cupid's Arrow Part II


 Hello Everyone!


This week we are sewing the lovely star crossed block. 


First, let's cut out pieces.  I used three different fat quarters plus the full width of fabric (WOF) white background for this block. My fat quarters had a lot of amazing color variation in them which gave dimension to my blocks. I am very happy with how they came out.  I am still working from the Island Batik Flower Pot group. Where I indicate 22" as the width, I am simply cutting the width of the fat qarter. It coud be 21 or 21 1/2" or 22 1/2". It doesn't matter.  There is plenty of fabric.


WOF - Width of Fabric   HST - Half Square Triangle    QST - Quarter Square Triangle
RST - Right Sides Together

Background:   Cut (4) 2 1/2" x WOF.  Subcut (64) 2 1/2" squares
                        Cut (1) 3 1/2" x WOF.  Subcut (8) 3 1/2" squares (for QST units)
                        Cut (3) 3" x WOF.  Subcut (32) 3" squares  (for HST units)

Sprig With Small Daisy:  Cut (5) 3" x 22"    Subcut (32) 3" squares (for star point HST units)

Petals Red Daiquiri:    Cut (2) x 22"    Subcut (8) 3 1/2" squares (for QST units)
                                    Cut (3) 3" x 22"    Subcut (16) 3" squares

Thyme w/Daisies Multi:  Cut (5) 2 1/2" x 22"    Subcut (40) 2 1/2" squares


Step1:  HST Units - We will make thes the same way we did for the LOVE blocks. Gather (32) Background squres and (32) Sprig with Small Daisy.  Draw a line on the back of the Background squares or even easier, udse your magic want. Place RST on the Sprig with Small Daisy blocks and sew 1/4" to either side of the line or if using a magic wand, sew on the lines. Cut apart through the center then press open to the dark. Square each to 2 1/2" square.  (64) HST units made.


Step 2:  QST Units - We start out with HST units then divide the block once more to create the QST unit. Gather (8) 3 1/2" Background squres nd (8) 3 1/2" Petals Red Daiquiri.  Follow the same technique as Step 1 to create (16 HST units. Gather the (3) Petals Red Daiquiri squares. Draw a line on the back same as we have done for the HST units. Place it RST on top of the HST units just created. The lines that you will be sewing should cross the seam, so in other words, the new seams will be perpindicular to the seam on the HST forming a cross. Sew then cut apart.  Square these units to 2 1/2". (32) QST units made.

Draw a line and sew 1/4" to each side or use the Magic Wand to draw sew line

Sew then cut the HST units apart between the seam lines.


Press open to the dark. Place the 3" square on top of the HST just made and draw a line or use the Magic Wand to draw sew line. The new seam crosses the seam on the HST. You seams will be like an X


Sew the same as the HST units then cut apart.  Press to the dark. Square the QST unit to 2 1/2".

Step 3:  Layout all the remaining squares, the HST units and the QST uits into rows as below.  Using a 1/4" seam allowance, sew each row together. Press your seams as per the diagram below, Join your rows together and press as indicated below.  Make (8) Blocks.  Square your blocks as needed to 10 1/2" being careful not to lose your points.


Voila!  Our Star Crossed Block is complete. Next week we will make hearts and arrows!